
A private label pet product needs an approved packaging system before production: the retail pack or hangtag, product insert, barcode plan, destination-market information, inner pack, master carton, shipping marks and a version-controlled artwork set. The exact elements depend on the product, market and sales channel, but each one must be assigned to a specific packaging surface and approved as a physical packed sample—not left as a generic note in an email.
For reliable private label pet product packaging, start with the minimum structure that protects the item and carries the required information. Add retail theatre only when it improves merchandising, unboxing or price perception enough to justify extra material, volume, cost and approval risk.
Key takeaways
- Choose the packaging level from the sales channel, product risk and shipping conditions before commissioning artwork.
- Control every packaging component in a packaging bill of materials.
- Reserve barcode quiet zones and scanner access in the dieline, then verify the printed pack—not only the PDF.
- Confirm warnings, traceability and operator details for the exact destination market; no generic global label covers every jurisdiction.
- Approve the unit pack, inner pack and master carton together under one released revision.
1. Choose a packaging level
Packaging begins as a commercial decision, not a graphic-design exercise. A simple collar sold online may need only a hangtag, barcode and protective bag. A grooming set on a retail shelf may need a formed insert, tamper evidence and a printed carton. A marketplace unit may also need channel-specific preparation and an exterior scannable label.
| Packaging level | Typical components | Best fit | Main trade-off |
|---|---|---|---|
| Minimum viable | Product label or hangtag, protective bag or band, barcode, essential instructions | Early low-MOQ launch, direct-to-consumer testing | Lowest setup and material use, but limited shelf communication |
| Retail-ready | Printed card, sleeve or carton, product insert, barcode, warnings and tamper control | Independent retail, gifting and marketplace listings | Stronger presentation with more artwork and print variables |
| Premium presentation | Rigid or specialty carton, fitted insert, tissue or pouch, finish effects and story card | Higher price point, gifting and influencer seeding | Higher unit cost, greater cube and more damage-prone finishes |
| Channel-prepared | Retail pack plus required prep, unit label, set marking or marketplace barcode | Fulfilment centres and marketplace inventory | Efficient receiving only when current channel rules are followed exactly |
Use the same architecture across several SKUs where practical. Shared carton footprints, insert sizes, label materials and artwork grids reduce tooling and make the range feel coherent. However, each size, colour, product identity and marketplace listing may still require a distinct barcode or artwork version.
Petlland’s 100-unit private-label launch guide explains why an existing product body with restrained packaging changes is often the fastest first collection. Petlland’s OEM and ODM process also separates stock-product branding, retail packaging, product modification and new tooling into different customisation levels with different sample paths.
Build a packaging bill of materials
The packaging BOM should identify every item that reaches the customer or supports transport. “Custom box included” is not a usable specification.
| BOM field | Example entry | What must be approved |
|---|---|---|
| Component ID | PKG-01 hangtag | Unique code tied to the SKU and artwork revision |
| Function | Brand and product information | The information assigned to this component |
| Material | Uncoated card or corrugated board | Grade, thickness or basis weight and approved supplier/equivalent rule |
| Finished size | Width × height × depth | Measurement points and buyer-defined tolerance |
| Structure | Dieline reference | Cut, crease, perforation, window, glue and locking style |
| Colour process and spot references | Approved proof, ink coverage and viewing condition | |
| Finish | Matte coating, varnish, foil or none | Appearance, rub resistance and any recycling impact |
| Variable data | GTIN, FNSKU, batch or date field | Data owner, format, print method and verification step |
| Quantity relationship | One per sellable unit | Pack count and replacement allowance |
| Artwork | ART-PKG-01-R04 | Exact released file and approval date |
| Quality criteria | Scannable, clean fold, no glue squeeze | Inspection method and defect classification |
The BOM should also say who purchases each component, where it is applied and whether it is packed at the product factory, a consolidation warehouse or the destination fulfilment centre. That responsibility affects lead time and who must hold the approved sample.
2. Prepare artwork and dielines
A dieline is the structural map for a packaging component. It must describe the actual finished pack, not merely provide a rectangle for a designer. Ask the packaging supplier to confirm the structure, material and manufacturing process before final artwork is placed.
What a controlled dieline should show
- finished dimensions and scale;
- cut lines, crease lines, perforations, windows, holes and glue areas;
- bleed, trim and safe-content zones;
- panel names and the normal viewing orientation;
- material thickness where it affects folds or inserts;
- barcode area and its protected quiet zone;
- variable-data fields and overlabel areas;
- revision number, date, units and approval status.
Keep structural lines on a non-printing technical layer and lock them before export. Put artwork, white ink, varnish, foil, embossing, spot colour and variable data on clearly named layers. Fonts should be licensed and packaged or converted to outlines according to the printer’s workflow. Linked images need enough effective resolution at final size and should not rely on a designer’s local file path.
Use a preflight handoff
Before the printer receives production artwork, confirm:
- The dieline revision matches the physical blank sample.
- The document uses the requested colour space and print profile.
- Bleed and safe areas meet the printer’s written specification.
- Small text, reversed text, line weights and knockouts are manufacturable.
- Every spot colour and finish is named once and used consistently.
- The barcode is vector or production-quality artwork with protected quiet zones.
- Variable fields are separated from fixed artwork and have a data owner.
- The exported PDF preserves the intended overprint and transparency settings.
Do not approve colour from an uncontrolled monitor screenshot. Use the proofing method agreed with the printer: a calibrated contract proof, drawdown, press proof or production-equivalent sample, depending on how important colour and finish are to the brand.
Version filenames should make mistakes difficult. A workable pattern is SKU-COMPONENT-REVISION-DATE, such as COL-01-HANGTAG-R04-20261011.pdf. Never use filenames such as final-final-2.pdf. The purchase order, packaging BOM, proof and physical sample should all point to the same released revision.
3. Place barcodes and required marks
Barcodes fail when the number is correct but the printed symbol cannot be scanned. GS1 advises checking the check digit, symbol size, bar height, contrast, colour, quiet zones, packaging interference and position. Its packaging guidance also warns against folds, edges, perforations and obstructions that compromise the symbol or its quiet zone.
Protect the barcode quiet zone
The quiet zone is the clear area beside or around a barcode that allows a scanner to recognise the symbol. Its required dimensions depend on the barcode type and X-dimension; do not invent one generic margin. Keep text, borders, patterns, varnish transitions, windows, seams and die-cut edges outside the required zone.
For a retail barcode, use dark bars on a light, non-reflective background unless the selected GS1 specification and print verification support another combination. Avoid red bars, low contrast, metallic substrates and transparent backgrounds over unpredictable product colours. Place the code on a flat, accessible surface and verify it after final printing, finishing, folding and packing.
| Barcode decision | Approval question | Evidence |
|---|---|---|
| Product identity | Which GTIN or marketplace identifier belongs to this exact SKU and variant? | Controlled SKU-to-code register |
| Symbol type | Which barcode is required by the retailer, marketplace or logistics process? | Channel requirement and GS1 specification |
| Size and quiet zone | Is the symbol within the permitted magnification and clear-space rules? | Dieline measurement and verification result |
| Placement | Can it be scanned without opening, flattening or bending the pack? | Packed-sample scan from normal orientations |
| Print quality | Are contrast, edge definition, bar growth and substrate suitable? | Production print verification or scan record |
| Multiple codes | Which code must remain visible and which must be covered? | Channel-specific barcode map |
For Amazon FBA, confirm the barcode method for the exact listing and shipment in Seller Central before printing. Amazon’s current packaging guidance requires an exterior, accessible scannable barcode for each unit and warns against placement on corners or curves. Where an Amazon barcode is required, it must match the exact unit and other scannable barcodes generally need to be covered; labels should lie flat and remain accessible after any preparation. Marketplace rules change, so the shipment workflow—not an old packaging template—must control the decision.
Build a destination-market information matrix
Required marks and warnings vary by product, material, claim, age group, market and channel. The table below is a planning index, not a universal compliance list.
| Information group | Possible content | Verification owner |
|---|---|---|
| Product identity | Product name, model, type, batch or serial reference | Brand and compliance owner |
| Economic operator | Manufacturer, importer or responsible-person contact details | Destination-market compliance owner |
| Origin | Country-of-origin statement where required | Importer or customs adviser |
| Materials and care | Fibre content, wash/care information or material declarations | Product and compliance owner |
| Warnings and instructions | Safe-use, age, small-part, suffocation or category-specific information | Product safety specialist |
| Language | Market-required language or languages | Local compliance owner |
| Environmental marks | Disposal, recycling, battery or packaging scheme marks where applicable | Market-specific environmental adviser |
| Channel labels | Retailer SKU, FNSKU, set label or fulfilment preparation label | Sales-channel operations owner |
The EU General Product Safety Regulation, for example, requires product identification and relevant manufacturer/importer/responsible-person details, plus clear instructions and safety information where needed. Whether a particular pet product needs additional category-specific marks must be determined for that exact item. Never copy a warning or conformity mark from a competitor’s pack without verifying that it applies.
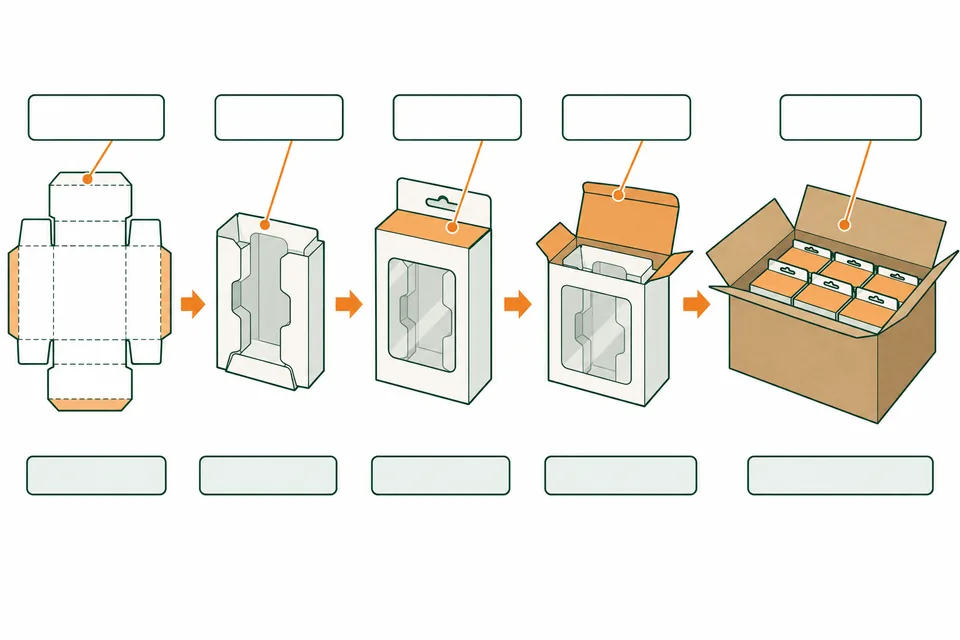
4. Specify inner and master cartons
Retail packaging protects and communicates at unit level; inner and master cartons control handling, count and transport. Specify all three as a system because a beautiful retail carton can still fail when it moves inside an oversized master carton.
Define the pack-out
Record:
- units per inner pack and inners per master carton;
- product orientation, dividers, bags, tissue, corner protection or void fill;
- carton board grade and construction;
- closure method and tape specification;
- finished external dimensions and buyer-defined tolerances;
- net weight, gross weight and maximum handling weight;
- pallet or floor-loading pattern where relevant;
- moisture, compression, vibration or drop-test requirements based on the distribution route.
Do not approve a carton using nominal dimensions before the final packed unit exists. Measure the actual production-equivalent pack, then allow only the space required for repeatable packing and protection. Excess air raises chargeable volume and lets units move; an over-tight carton crushes retail packs and slows packing.
Master-carton field diagram
A practical shipping-mark panel can reserve fields in this order:
- Brand or consignee identifier.
- Purchase order number.
- Product name and SKU.
- Colour, size or variant.
- Quantity per carton.
- Carton sequence, such as carton 1 of 20.
- Net and gross weight.
- External carton dimensions.
- Country of origin where required.
- Batch, lot or production-date reference.
- Handling marks and channel labels.
- Logistics barcode or SSCC where the supply chain uses one.
Keep retail, marketplace and logistics barcodes visually separated so scanners do not capture the wrong code. Confirm which shipping labels are applied by the factory and which are generated later by the freight forwarder or marketplace. A blank reserved panel is often safer than printing shipment-specific data months in advance.
Use Petlland’s sourcing, QC and DDP services to coordinate pack-out, carton measurement, consolidation and inspection when several factories feed one shipment. The final freight quotation should use measured carton data from the approved pack-out, not a catalogue estimate.
5. Approve packaging samples
Packaging approval should move from inexpensive digital checks to production-equivalent physical evidence. Each stage closes a different risk.
| Approval stage | What it proves | What it does not prove |
|---|---|---|
| On-screen artwork review | Copy, hierarchy, SKU data and basic placement | True colour, scale, substrate, folds or scan quality |
| Printed size mock-up | Legibility and physical scale | Production colour or finishing |
| Blank structural sample | Fit, assembly, opening and product retention | Print quality, coating or barcode performance |
| Colour or finish proof | Colour intent and selected effects | Final converting and packed performance |
| Production-equivalent retail sample | Print, structure, product fit, barcode and presentation | Master-carton protection unless packed into the shipper |
| Full pack-out sample | Unit count, inner pack, carton fit, marks, weight and handling | Repeated production consistency without inspection |
Final packaging approval checklist
Approve the complete set only when:
- every component appears in the packaging BOM;
- the dieline and artwork carry the same released revision;
- copy, claims, translations, contact details, warnings and identifiers are verified;
- the correct barcode is assigned to each SKU and scans on the finished pack;
- quiet zones, contrast and placement survive printing, finishing and packing;
- the product fits without damage, movement or misleading presentation;
- the pack opens, closes and displays as intended;
- any insert is present, oriented correctly and readable;
- inner-pack and master-carton quantities are correct;
- carton dimensions, net weight, gross weight and marks are measured and recorded;
- required channel preparation is confirmed against the current account workflow;
- buyer and supplier sign the same sample and document revision.
Retain one sealed packaging golden sample at the supplier and one with the buyer when practical. Photograph all sides, the open pack, product placement, barcode, insert, inner pack and carton mark panel. Link those images to the BOM and change log.
After approval, any change to substrate, coating, adhesive, structure, printer, artwork, warning, barcode, pack quantity or carton data should enter change control. Classify its impact and reapprove the affected evidence. A “small” dieline adjustment can move a barcode onto a curve; a new coating can change scan contrast; a pack-count change can invalidate carton marks and fulfilment labels.
Send your packaging brief for a feasibility review. Include the product, target market, sales channel, quantity, current artwork, preferred packaging level, barcode method, required warnings, pack-out and target launch date. Petlland can review the structure, MOQ, sample path and information gaps before print production; use the contact page to submit the files.
Frequently asked questions
Which packaging elements does a private label pet product need before production?
At minimum, define the unit-level protection or display component, brand/product information, barcode, destination-market information, instructions or warnings where applicable, inner pack, master carton, shipping marks and the exact released artwork revision. The physical packed sample must match the packaging BOM.
Do all pet products need a retail box?
No. A hangtag, band, insert or protective bag may be enough for a low-MOQ online product if it protects the item and carries the required information. Use a carton when the product, sales channel or merchandising benefit justifies the extra material, volume and cost.
What is the difference between a hangtag and a product insert?
A hangtag is attached to the product and usually carries identity, branding, barcode and concise information. An insert sits inside the pack and can provide longer instructions, care, warnings, assembly or brand content. Their roles should not overlap accidentally; assign each required message to one controlled component.
Can a UPC and an Amazon FNSKU appear on the same package?
That depends on the current fulfilment method and listing requirements. When Amazon requires an Amazon barcode, other scannable barcodes generally need to be covered so the correct code is captured. Confirm the exact requirement in Seller Central for the product and shipment before printing or applying labels.
How much blank space does a barcode need?
The quiet-zone requirement depends on the symbol type and X-dimension. Use the applicable GS1 specification or channel standard rather than a generic visual margin. Keep graphics, text, folds, seams and finishes out of that protected space and verify the final printed pack.
Which warnings must go on pet product packaging?
There is no single list for every pet product. The answer depends on product design, materials, foreseeable users, claims, destination law and retailer rules. Complete a product-specific risk and compliance review, then approve the exact wording, language, location and permanence before printing.
Should packaging be approved from a PDF proof?
No. A PDF can close copy and layout issues, but final approval should include a production-equivalent packed sample. It must prove structure, fit, print, finish, barcode scanning, inserts, pack quantity, carton data and handling.
Evidence sources used
- Petlland, How to Start a Private Label Pet Product Brand with Just 100 Units — low-MOQ customisation and first-order planning.
- Petlland, OEM & ODM Pet Products Manufacturing — published packaging customisation and approval workflow.
- GS1, 10 Steps to Barcode Your Product and barcode quality guidance — quiet zones, contrast, size, placement and print-quality controls.
- Amazon Seller Central, Product packaging requirements — current unit-barcode access, placement and packaging principles; account-specific requirements still control.
- European Commission, EU General Product Safety Regulation obligations for businesses — product identification, economic-operator details and safety information.
Editorial note: Packaging and labelling obligations vary by product, claim, destination and channel. This guide is an operational framework, not legal or regulatory advice. Verify every required mark and warning for the exact product before production.